PyTorch 高级篇(3):神经风格迁移(Neural Style Transfer)
参考代码
yunjey的 pytorch tutorial系列
神经风格迁移 学习资料
相关文献
Neural Style Transfer: A Review
上文的中文解读: 神经风格迁移研究概述:从当前研究到未来方向
视频讲解
8分钟如何理解neural style transfer的模型和损失函数
关于VGG-19网络
利用卷积神经网络(VGG19)实现火灾分类(附tensorflow代码及训练集)
PyTorch 实现 预处理 1 2 3 4 5 6 7 8 9 10 from __future__ import divisionfrom torchvision import modelsfrom torchvision import transformsfrom PIL import Imageimport argparseimport torchimport torchvisionimport torch.nn as nnimport numpy as np
1 2 3 torch.cuda.set_device(1 ) device = torch.device('cuda' if torch.cuda.is_available() else 'cpu' )
图像加载函数 1 2 3 4 5 6 7 8 9 10 11 12 13 14 15 16 17 def load_image (image_path, transform=None , max_size=None , shape=None ): """加载图像,并进行Resize、transform操作""" image = Image.open (image_path) if max_size: scale = max_size / max (image.size) size = np.array(image.size) * scale image = image.resize(size.astype(int ), Image.ANTIALIAS) if shape: image = image.resize(shape, Image.LANCZOS) if transform: image = transform(image).unsqueeze(0 ) return image.to(device)
模型加载 这次实验用的CNN模型是VGG-19。
CNN模型是用来提取特征使用的,风格迁移过程中并不需要对其进行优化。
1 2 3 4 5 6 7 8 9 10 11 12 13 14 15 16 17 18 class VGGNet (nn.Module): def __init__ (self ): """Select conv1_1 ~ conv5_1 activation maps.""" super (VGGNet, self).__init__() self.select = ['0' , '5' , '10' , '19' , '28' ] self.vgg = models.vgg19(pretrained=True ).features def forward (self, x ): """Extract multiple convolutional feature maps.""" features = [] for name, layer in self.vgg._modules.items(): x = layer(x) if name in self.select: features.append(x) return features
处理流程函数 1 2 3 4 5 6 7 8 9 10 11 12 13 14 15 16 17 18 19 20 21 22 23 24 25 26 27 28 29 30 31 32 33 34 35 36 37 38 39 40 41 42 43 44 45 46 47 48 49 50 51 52 53 54 55 56 57 58 59 60 61 62 63 64 65 66 67 68 69 70 def transfer (config ): transform = transforms.Compose([ transforms.ToTensor(), transforms.Normalize(mean=(0.485 , 0.456 , 0.406 ), std=(0.229 , 0.224 , 0.225 ))]) content = load_image(config.content, transform, max_size=config.max_size) style = load_image(config.style, transform, shape=[content.size(2 ), content.size(3 )]) target = content.clone().requires_grad_(True ) optimizer = torch.optim.Adam([target], lr=config.lr, betas=[0.5 , 0.999 ]) vgg = VGGNet().to(device).eval () for step in range (config.total_step): target_features = vgg(target) content_features = vgg(content) style_features = vgg(style) style_loss = 0 content_loss = 0 for f1, f2, f3 in zip (target_features, content_features, style_features): content_loss += torch.mean((f1 - f2)**2 ) _, c, h, w = f1.size() f1 = f1.view(c, h * w) f3 = f3.view(c, h * w) f1 = torch.mm(f1, f1.t()) f3 = torch.mm(f3, f3.t()) style_loss += torch.mean((f1 - f3)**2 ) / (c * h * w) loss = content_loss + config.style_weight * style_loss optimizer.zero_grad() loss.backward() optimizer.step() if (step+1 ) % config.log_step == 0 : print ('Step [{}/{}], Content Loss: {:.4f}, Style Loss: {:.4f}' .format (step+1 , config.total_step, content_loss.item(), style_loss.item())) if (step+1 ) % config.sample_step == 0 : denorm = transforms.Normalize((-2.12 , -2.04 , -1.80 ), (4.37 , 4.46 , 4.44 )) img = target.clone().squeeze() img = denorm(img).clamp_(0 , 1 ) torchvision.utils.save_image(img, 'output-{}.png' .format (step+1 ))
运行代码,进行风格迁移 1 2 3 4 5 6 7 8 9 10 11 12 13 14 15 16 parser = argparse.ArgumentParser() parser.add_argument('--content' , type =str , default='content.jpg' ) parser.add_argument('--style' , type =str , default='style.jpg' ) parser.add_argument('--max_size' , type =int , default=400 ) parser.add_argument('--total_step' , type =int , default=5000 ) parser.add_argument('--log_step' , type =int , default=50 ) parser.add_argument('--sample_step' , type =int , default=500 ) parser.add_argument('--style_weight' , type =float , default=100 ) parser.add_argument('--lr' , type =float , default=0.003 ) config = parser.parse_args(args=[]) print (config)transfer(config)
Namespace(content='content.jpg', log_step=50, lr=0.003, max_size=400, sample_step=500, style='style.jpg', style_weight=100, total_step=5000)
Step [50/5000], Content Loss: 24.2413, Style Loss: 574.5425
Step [100/5000], Content Loss: 32.4526, Style Loss: 339.3264
Step [150/5000], Content Loss: 36.3637, Style Loss: 249.3080
Step [200/5000], Content Loss: 38.6992, Style Loss: 201.1833
Step [250/5000], Content Loss: 40.4127, Style Loss: 169.7927
Step [300/5000], Content Loss: 41.7685, Style Loss: 147.1366
Step [350/5000], Content Loss: 42.9247, Style Loss: 129.5607
Step [400/5000], Content Loss: 43.9380, Style Loss: 115.4246
Step [450/5000], Content Loss: 44.8378, Style Loss: 103.7703
Step [500/5000], Content Loss: 45.6480, Style Loss: 93.9557

...............................

Step [4550/5000], Content Loss: 60.1855, Style Loss: 7.7346
Step [4600/5000], Content Loss: 60.2602, Style Loss: 7.6380
Step [4650/5000], Content Loss: 60.3198, Style Loss: 7.5478
Step [4700/5000], Content Loss: 60.2494, Style Loss: 7.5044
Step [4750/5000], Content Loss: 60.1906, Style Loss: 7.4796
Step [4800/5000], Content Loss: 60.5637, Style Loss: 7.2808
Step [4850/5000], Content Loss: 60.7279, Style Loss: 7.2457
Step [4900/5000], Content Loss: 61.5393, Style Loss: 12.0014
Step [4950/5000], Content Loss: 60.5947, Style Loss: 7.3682
Step [5000/5000], Content Loss: 60.7322, Style Loss: 7.1284
结果展示 1 2 3 4 import matplotlib.pyplot as plt import matplotlib.image as mpimg import numpy as np
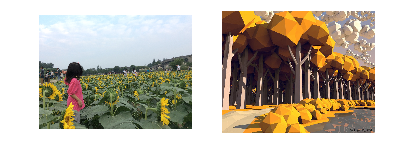
content图像和style图像 1 2 3 4 5 6 7 8 9 10 11 12 13 14 15 content= './content.jpg' contentImg = mpimg.imread(content) style = './style.jpg' styleImg = mpimg.imread(style) plt.figure() plt.subplot(1 ,2 ,1 ) plt.imshow(contentImg) plt.axis('off' ) plt.subplot(1 ,2 ,2 ) plt.imshow(styleImg) plt.axis('off' ) plt.show()
迁移结果(训练第500次和第5000次) 1 2 3 4 5 6 7 8 9 10 11 12 13 14 trans1= './output-500.png' trans1Img = mpimg.imread(trans1) trans2 = './output-5000.png' trans2Img = mpimg.imread(trans2) plt.figure() plt.subplot(1 ,2 ,1 ) plt.imshow(trans1Img) plt.axis('off' ) plt.subplot(1 ,2 ,2 ) plt.imshow(trans2Img) plt.axis('off' ) plt.show()